Address
304 North Cardinal St.
Dorchester Center, MA 02124
Work Hours
Monday to Friday: 7AM - 7PM
Weekend: 10AM - 5PM
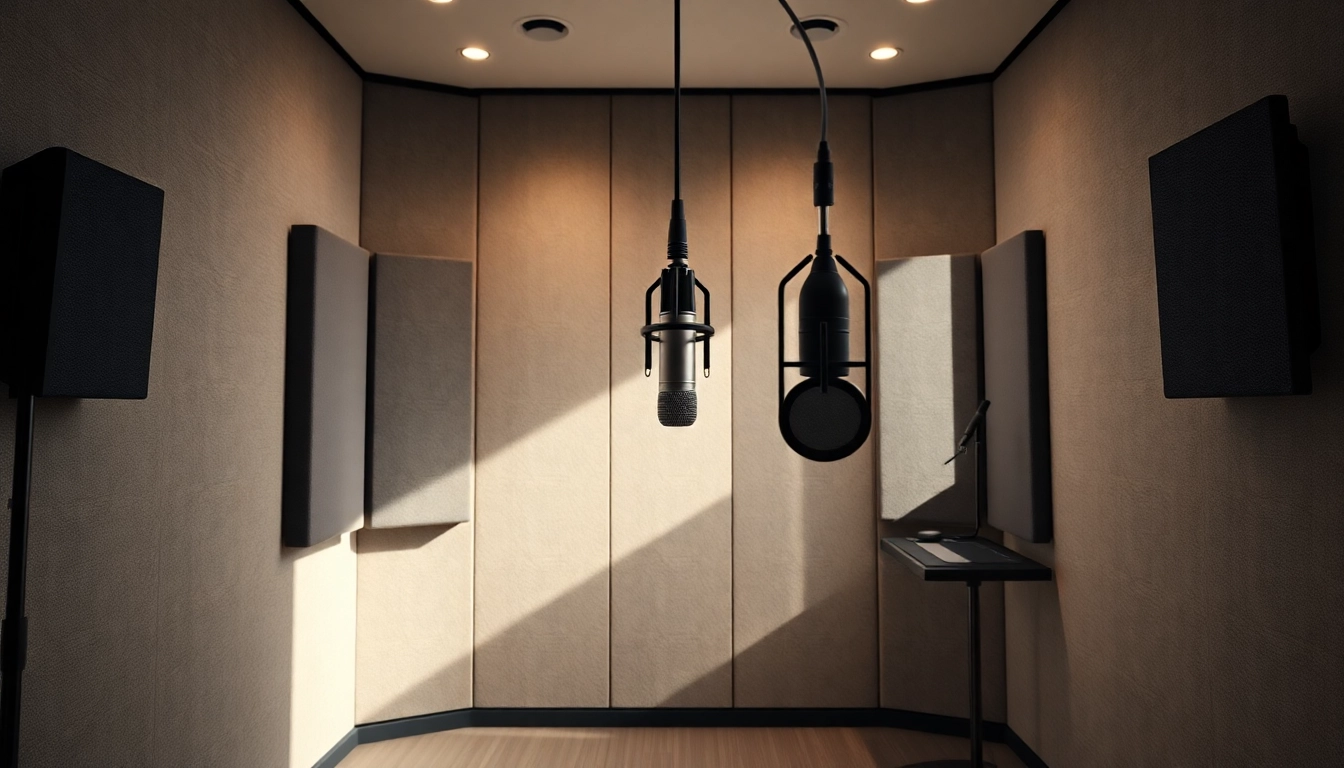
Discover how sound booth acoustic treatment can dramatically enhance your audio quality, cut noise, and deliver studio-level clarity for all your recordings.
When it comes to capturing high-quality audio, most people obsess over microphones and editing software. But here’s the truth: your environment does most of the heavy lifting. That’s where sound booth acoustic treatment becomes a game-changer.
You’re speaking into your mic, and everything seems fine. But after playback, you notice a subtle ring, echo, or general hollow feel that makes your content sound… amateurish. No amount of EQ magic in post can fix a poorly treated room.
Echoes, flutter, and reverb all distort your voice and make it harder for listeners to stay engaged. Inconsistent sound quality also breaks the professional image you’re trying to project—especially for clients, investors, or a growing audience.
Sound booth acoustic treatment minimizes reflective surfaces and balances frequencies within your recording space. Proper treatment ensures your audio is clearer, warmer, and more intimate—which is exactly what you need for podcasts, voiceovers, video content, and webinars.
Benefits of effective sound booth acoustic treatment:
No matter how powerful your mic or software is, your room defines your raw sound. Investing in proper treatment isn’t a luxury—it’s a foundational choice for content clarity. The next sections will help you avoid common mistakes and build the ideal sound booth setup.
Now that you understand the value of sound booth acoustic treatment, let’s explore the most common traps that even experienced content creators fall into—mistakes that can sabotage your sound quality before you ever hit record.
Square rooms or small spaces with parallel walls can cause standing waves and flutter echo, distorting your voice. Instead, aim for irregular shapes or treat opposing surfaces with absorptive materials to disrupt sound bounce.
Those egg-crate foam panels? They only target mid and high frequencies. Relying solely on them leaves low-frequency problems (like muddy bass tones) untouched. Effective sound booth acoustic treatment requires a balance of absorption, diffusion, and bass trapping.
Don’t confuse sound absorption with soundproofing. Many solopreneurs skip isolation, especially in shared or urban environments. Without measures like mass-loaded vinyl or resilient channeling, outside noise will still creep in.
Furniture, desks, or even windows inside or near your booth reflect sound. Position your mic away from reflective surfaces and use rugs or fabric coverings to help dampen sound.
Designing your booth without a clear plan can degrade your sound and waste your budget. Avoid these missteps and build with intention—because even the smallest acoustic flaws can have big listening consequences.
To achieve professional sound clarity, choosing the right materials is as important as the overall booth design. Let’s break down the ingredients of impactful sound booth acoustic treatment so you can fine-tune your recording space like a pro.
While acoustic foam is affordable and aesthetically popular, it often lacks the density to handle full-spectrum sound. High-density fiberglass or mineral wool panels (like Rockwool or Owens Corning 703) provide much better absorption for both mids and lows.
Tip: Use foam for high-frequency diffusion, but combine with dense panels for broader acoustic control.
Bass frequencies gather in corners—left untreated, they cause boominess and mask clarity. Bass traps, often made of thick rigid fiberglass, are essential to a balanced space. Install them in all vertical corners of your booth, floor to ceiling if possible.
Too much absorption can make audio dull and lifeless. Diffusers scatter soundwaves, retaining natural reverb and liveliness. Try adding wood skyline diffusers or bookshelf-style wall units to break up sound energy in the rear of the booth.
If you’re working with a tight budget or shared space, focus on portable options like:
The right mix of materials transforms your audio from flat to full-bodied. Treating your space with thoughtful, layered sound booth acoustic treatment ensures consistent excellence in every recording.
You don’t need a fancy studio or a five-figure budget to benefit from sound booth acoustic treatment. With the right approach, solopreneurs and growing teams can build a highly effective recording space at home—or in a small office.
Use weather stripping around doors and windows, add heavy curtains or moving blankets over glass, and place thick rugs or carpet to absorb reflections from the floor.
Pro Tip: Even a small air gap (like under a door) can introduce noise. Block it with door draft stoppers or custom cut foam.
Record a test session and use software analysis (like Room EQ Wizard) to identify frequency problems in your booth. Adjust placement of panels for better absorption or diffusion.
Sound booth acoustic treatment is iterative. Start simple, record, and adjust based on what you hear. You can also:
Don’t underestimate the power of homegrown solutions. With a bit of effort and creativity, you can build a booth that rivals commercial studios—especially when guided by the principles of thoughtful sound booth acoustic treatment.
Even in a well-treated environment, digital tools can greatly enhance or hinder your final product. The right SaaS platforms ensure your sound booth acoustic treatment feeds into a seamless, high-quality production workflow.
Remote work, podcasting, webinars, and course creation demand consistency—across devices, sessions, and time zones. SaaS platforms enable audio capture, enhancement, and collaboration in the cloud, helping you maintain quality across all your channels.
Here’s how to optimize your SaaS toolset around your sound booth acoustic treatment:
When paired with solid sound booth acoustic treatment, SaaS audio tools become a powerful ally in delivering content that sounds—and feels—professional. Think of them as companions to your booth, not replacements for good treatment.
We’ve journeyed through the core pillars of building exceptional audio clarity—from understanding how sound booth acoustic treatment impacts your voice, to avoiding costly design mistakes, picking the right materials, executing a powerful DIY strategy, and leveraging SaaS tools that turbocharge your process.
Your recording quality is more than just sound—it’s trust, authority, and professionalism rolled into every decibel. Whether you’re recording your first podcast or scaling a content-driven business, investing time in acoustic treatment is not optional—it’s foundational.
Don’t wait for noisy distractions or ‘fix-it-in-post’ headaches to derail your message. Future-proof your audio quality with a holistic approach starting from the space you speak in. After all, when clarity comes through, so does your brand’s voice.
So what’s your next move—will you keep tolerating echo and noise? Or will you build your quiet kingdom, one panel at a time?